
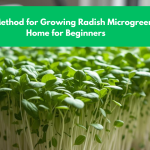
Radish microgreens are one of the fastest and most rewarding greens you can grow at home. In just a few days, tiny seeds transform into vibrant, spicy-flavored greens that elevate salads, sandwiches, soups, and everyday meals. For beginners, radish microgreens are often the first successful growing experience because they are forgiving, quick, and require very little space or equipment.
Unlike mature radishes, microgreens are harvested young, when their first leaves appear. At this stage, they are packed with flavor and nutrients and do not require long-term care. This makes them perfect for apartments, kitchens, and anyone new to gardening. This guide explains a simple, reliable method to grow radish microgreens at home, step by step, using easy techniques that consistently produce healthy results.
Understanding Radish Microgreens and Their Growth Cycle
Radish microgreens are young seedlings harvested shortly after germination.
They are grown for their tender stems and leaves, not for developing roots. The entire growing cycle usually lasts between 7 and 10 days, making them one of the fastest microgreens to harvest.
Because they rely mainly on nutrients stored in the seed, radish microgreens do not require fertilizer. Their rapid growth makes them ideal for beginners who want quick success.
Why Radish Microgreens Are Perfect for Beginners
Radish microgreens are extremely beginner-friendly.

They germinate quickly, grow evenly, and tolerate small mistakes better than many other microgreens. Even if light or watering is not perfect, they usually still grow.
Another advantage is their bold flavor. A small handful adds noticeable taste to meals, making the effort feel worthwhile even with small harvests.
Choosing the Right Radish Seeds
Seed quality affects both growth and flavor.

Choose radish seeds labeled for microgreens or sprouting. These seeds are untreated and safe for edible use.
Avoid seeds that are coated or chemically treated. Fresh, high-quality seeds produce uniform growth and reduce the risk of mold or uneven germination.
Selecting Containers for Growing Radish Microgreens
Radish microgreens do not require deep containers.

Shallow trays, seedling trays, or reused food containers work well as long as they are clean. Containers should be at least 2 inches deep.
Drainage holes are highly recommended. They prevent excess moisture from building up, which is one of the main causes of microgreen failure.
Preparing the Growing Medium
Radish microgreens grow well in several mediums.

A light potting mix is the most common choice for beginners. Coconut coir also works well and stays clean and evenly moist.
Whichever medium you choose, it should be loose and well-draining. Avoid compacted soil, which restricts root development and airflow.
Lightly moisten the growing medium before planting so it is damp but not wet.

Sowing Radish Seeds Correctly
Seed density plays a key role in success.
Spread seeds evenly across the surface of the growing medium. Seeds can be close together but should not overlap excessively.
After spreading, gently press seeds into the surface without burying them deeply. A very thin layer of soil or growing medium can be added on top if desired.

Mist lightly to settle seeds into place.
Creating the Right Germination Conditions
Radish seeds germinate best in warm, moist conditions.
Cover the tray loosely with another tray, lid, or breathable cover to block light and retain moisture during the first few days.

Place the tray in a warm area away from direct sunlight. Germination usually begins within 2–3 days.
Check moisture daily and mist lightly if the surface begins to dry.
Uncovering and Introducing Light
Once seeds sprout, remove the cover immediately.
At this stage, light is essential. Place the tray in a bright location near a window or under a grow light.
Radish microgreens need bright light to grow sturdy stems. Insufficient light causes tall, weak, and floppy growth.
Rotate the tray daily if using window light to ensure even exposure.
Watering Radish Microgreens Properly
Proper watering prevents most problems.
Water gently using a spray bottle or bottom-watering method. Bottom watering is especially effective because it keeps stems dry.
Keep the growing medium consistently moist but never waterlogged. Overwatering leads to mold and root issues.
Maintaining Ideal Indoor Conditions
Radish microgreens grow best in moderate indoor temperatures.
A temperature range of 18°C to 24°C is ideal. Avoid placing trays near heaters, air conditioners, or cold drafts.
Stable temperatures encourage even growth and reduce stress on seedlings.
Importance of Air Circulation
Good airflow is often overlooked but very important.
Air circulation reduces moisture buildup on stems and soil, which helps prevent mold. Simply growing microgreens in a well-ventilated room is usually enough.
Avoid enclosing trays once seedlings have emerged.
Do Radish Microgreens Need Fertilizer
Radish microgreens do not need fertilizer.
All necessary nutrients are stored in the seed and used during the short growing cycle. Adding fertilizer often causes more harm than good.
Focus on light, moisture, and airflow instead of feeding.
Common Problems and How to Avoid Them
Mold is the most common issue.
It usually appears when moisture is too high and airflow is poor. Reduce watering, improve ventilation, and avoid overcrowding seeds.
Leggy growth means light is insufficient. Move trays closer to a light source or increase light duration.
Yellowing leaves can occur if microgreens are kept in darkness too long after sprouting.
How Long Radish Microgreens Take to Grow
Radish microgreens are among the fastest to harvest.
Most are ready within 7–10 days after sowing. Growth speed depends on temperature, light, and seed quality.
Harvesting at the right time ensures the best flavor and texture.
Harvesting Radish Microgreens Correctly
Harvest when the first true leaves appear and stems are upright and firm.
Use clean scissors to cut microgreens just above the soil surface. Avoid pulling them out, as this disturbs the growing medium.
Harvesting in the morning provides the freshest greens.
Harvesting for Best Flavor
Radish microgreens have the best flavor when young.
If left too long, they may become tougher or overly spicy. Timely harvesting maintains balance and tenderness.
Harvest only what you need, as microgreens are best eaten fresh.
Storing Harvested Radish Microgreens
Fresh microgreens taste best when used immediately.
If storage is needed, place them in a dry container lined with paper towel and refrigerate. Avoid washing until just before use.
Properly stored microgreens usually last 2–3 days.
Using Radish Microgreens in Daily Meals
Radish microgreens add a peppery kick.
They are excellent in salads, sandwiches, wraps, soups, omelets, and as garnish. A small amount goes a long way.
They are especially useful for adding flavor without extra seasoning.
Growing Radish Microgreens Continuously
For a steady supply, stagger plantings.
Sow a new tray every week. This ensures that one batch is always ready to harvest while another is growing.
This method works well even in very small kitchens.
Cleaning and Reusing Trays
After harvesting, clean trays thoroughly.
Wash with warm water and mild soap, then dry completely before reuse. Clean trays reduce the risk of mold and disease.
Using fresh growing medium each time ensures consistent results.
Growing Radish Microgreens Without Soil
Radish microgreens can also be grown on grow mats or paper-based mediums.
This method is clean and convenient but requires careful moisture control.
Beginners often find soil or coconut coir easier to manage.
Growing With Children and Beginners
Radish microgreens are excellent for learning.
Their fast growth keeps interest high, and the process is simple and safe. Children enjoy seeing results in just a few days.
Minimal tools and cleanup make it suitable for classrooms and kitchens.
Real Experiences From Home Growers
A first-time grower shared that radish microgreens were their fastest success. “I planted them on a Sunday and harvested by the next weekend,” they said.
Another noted that switching to bottom watering eliminated mold problems completely.
Observations From Regular Microgreen Growers
Experienced growers often recommend radish microgreens as a starter crop.
They highlight consistent germination, bold flavor, and minimal care requirements.
Many also use radish microgreens as a base to mix with milder greens.
Nutritional Benefits of Radish Microgreens
Radish microgreens are rich in vitamins and antioxidants.
They offer concentrated nutrients in a small serving and support a balanced diet.
Fresh homegrown microgreens retain more nutrients than store-bought greens.
Sustainability Benefits of Growing Microgreens at Home
Growing microgreens reduces food waste and packaging.
It lowers reliance on store-bought greens and encourages fresh eating habits.
Because the process is quick and repeatable, it easily fits into daily routines.
What You Should Know Before Starting
Radish microgreens are quick but short-lived.
They need consistent light and moisture but no fertilizer.
With basic care, even complete beginners can grow successful batches.
Questions and Answers About Growing Radish Microgreens at Home
Are radish microgreens easy to grow?
Yes, they are one of the easiest microgreens.
How long do they take to grow?
About 7–10 days.
Do they need sunlight?
Yes, bright light after sprouting.
Can they be grown indoors?
Yes, they are ideal for indoor growing.
Do they need fertilizer?
No, fertilizer is not needed.
Why is mold forming on my tray?
Too much moisture or poor airflow.
Can they be grown without soil?
Yes, on grow mats or similar mediums.
How often should they be watered?
Lightly, keeping soil moist.
Can they be grown year-round?
Yes, indoors they grow year-round.
How should they be harvested?
Cut above the soil with scissors.
Are they spicy?
Yes, mildly to moderately spicy.
Can children grow them?
Yes, they are very beginner-friendly.
How long do they last after harvest?
Best used within 2–3 days.
Are radish microgreens healthy?
Yes, they are very nutritious.


Leave a Comment